A Request for Quotation is a document that contains the required goods/services and is sent to the supplier to quote against the same. This document is sent to multiple suppliers to get the best quote and this RFQ can be converted into an Auction or a Rate Contract or Purchase Order after the Quote comparison approval.
Following the below mentioned steps, creating a request for quote in Aerchain is simple
Creating a Request for Quotation
Go to Modules > Select New RFQ Under the request for quotes section.
The new RFQ form will be opened, fill the details in the form with all the mandatory fields (marked with an asterisk ( * ) symbol). Below is the example and brief explanation of the form.

Subject: Enter a short and informative subject that best explains the purpose of this RFQ
Allowed currency: Select the currency(s) that is preferred by your organization to do business with the vendors
Currency Conversion rate: The currency conversion rate will be populated based on the inputs in the org-settings. Click on the settings button() to change/add the pre-populated conversion rates
Frequency: You can select the frequency from the dropdown at which rate this RFQ will occur in future
Cost Center, Delivery Address & Billing Address: All these filed will have the drop-down list of options and depending on the creator role and facility the drop-down will populate the relevant options. Select the one's which best fit for this RFQ. (W.r.t customer field configuration, ledger can be another field which needs to be filled).
Company: The company will be updated automatically if there is only one company associated with the selected billing address. If there are multiple companies defined for a facility, then you can select an appropriate company from the dropdown.
Deadline for Quote: Here you can select the date for the submission of the quotes by the suppliers.
Deadline Type: There are two type of deadline - Soft & Hard. Soft means that the supplier can submit quote even after the deadline has passed. If Hard, supplier will not be able to submit / update quotes after given deadline.
Expected Delivery Date: You can select the desired delivery date from the calendar that will be visible to the supplier as well.
Payment terms: Select the desire payment term from the drop down. Next to this you will have two options available i.e. Fixed and Flexible. If you select a flexible option, the supplier will be able to modify the payment term. In case of fixed, the supplier cannot alter the payment terms decided by the customer.
Reference: This is the reference field for the RFQ. This can be used for internal tracking.
Auto release quote request: If selected Yes, the RFQ will be sent to the suppliers directly after the RFQ is approved. If selected No, the RFQ will come back to the creator and the they must manually release it to the supplier.
Additional charges settings: These are the settings to control additional charges added by suppliers on quote. There are three options available that the user must choose from
- ‘No’ means that the supplier cannot add any additional charges on Quotation they will be submitting
- ‘Flexible’ denotes that the supplier can add any additional charges on quote
- ‘Fixed’ means the the supplier can add additional charges only on the selected items by the customer.
Budget: Select the appropriate budget for the RFQ if applicable.
Users: You can select names of your team members from the drop-down list who can access this RFQ. They will be added as collaborators to this RFQ.
Add Questionnaires: Any technical or non-technical questions cab be asked to the suppliers. Click on Add Questionnaire and select a Questionnaire template or create new by clicking on "+New". Add sections and questions and define the respective field response type and set the questions as mandatory or required. Multiple questionnaires can also be created.

Items: There are three ways ways to add one or multiple items to the RFQ that is being created
By searching the Item name: The first option is by searching the item name in the search bar of the product. A list of items according to your search will be displayed, select the item from the list

If there are multiple products to be added, and you need an easier way to add the products, you can use the bulk add products.
Upon selecting the 'Bulk Add products' button a new window will open as shown in the image below
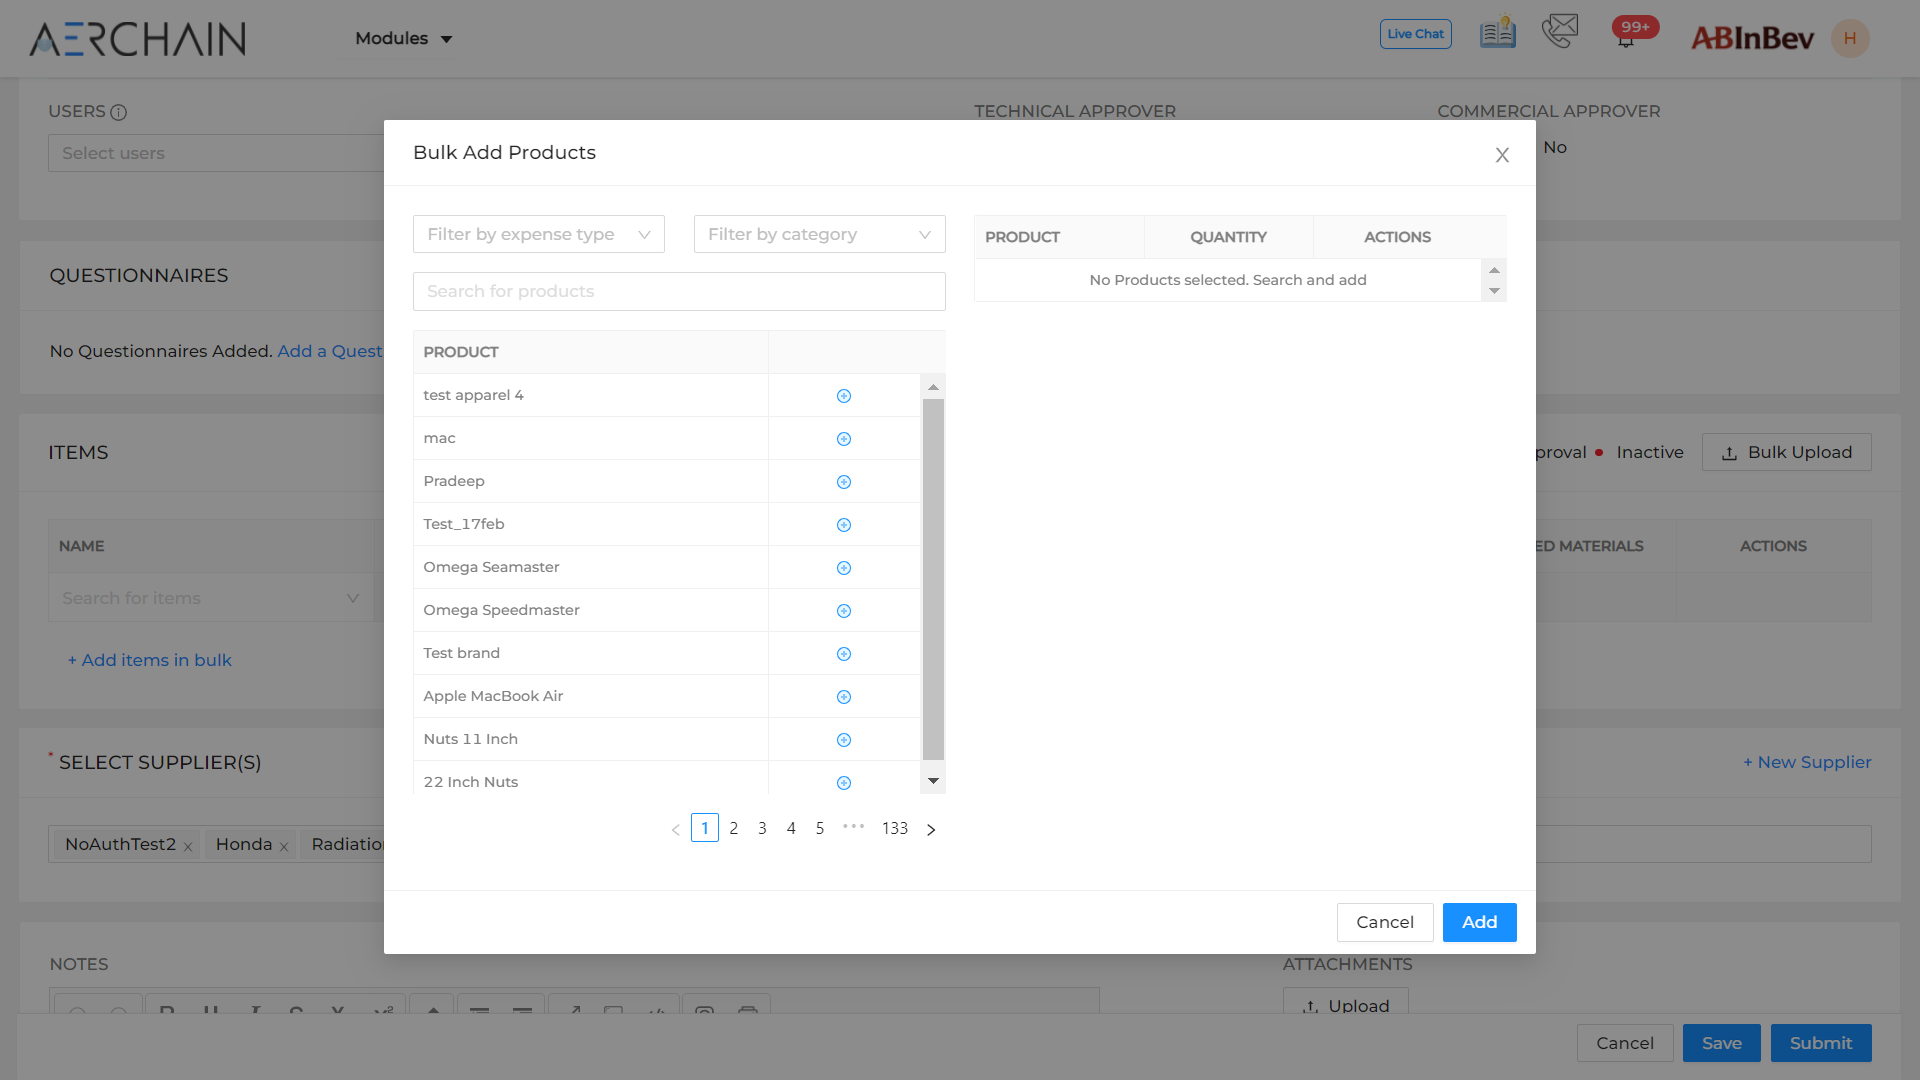
Select the products from the left panel by clicking on the + button beside each product.
The selected products will be pushed to the right panel, here the user can input quantity
Finally click on submit, all the items from the right panel will be populated under ITEMS table
For Bulk Items Upload: Use the "Bulk Upload" option from the right corner of item table when there are more than one too many items that are needed to be added. Initially, download the file and upload the updated file with all the mandatory fields mentioned in the template.
Please Note: To bulk upload in such cases, having the product code for all of the products is essential, you can gather the product codes for all the necessary line-items from the Product master file.
Follow the below steps to understand the process of bulk upload
Click the bulk upload button and download the file that has the format in which the bulk upload must be done. Download the master that is shown in the dialog box when clicked on the bulk upload button file that contains the list of all products in the platform

There is another way to Download Product Master file from Report Section: For downloading the product master file, Go to "Modules" from the header. Select "Reports" and select "Product master" and "generate report" then download the product master file. Copy the product odes for required items and paste it in the Bulk Upload file.
Once you upload the file, all the products are added to the list. You can click on the "Validate" button to check if all the product details are correct. If, it is incorrect, then you can select "Download the template with error" button and re-upload the file after correcting the errors.
After updating the products you can add a description for the product, change the UOM, quantity, for the product.
You can also upload an attachment for each line item if required.
Add Extra Charges: There are two options available i.e. Fixed and Flexible. If you select "Flexible" then suppliers can add an additional charges to the selected fields shown in the dropdown. If you select "Fixed option", then the supplier can add an additional charge to the selected field and other fields are not visible to the supplier.
Select suppliers: Select the supplier from the dropdown by searching the name of the supplier. Only the suppliers onboarded on to the Aerchain platform will be populated. In case you need to add a new supplier, refer to this article.

Notes and Attachments: If there is any additional information that needs to be conveyed to the supplier, include that information in text or attach the necessary files (3).
Terms and Condition: All the related terms and conditions (4) which are setup in the Org Setting will reflect here. If there are multiple terms and conditions select the required terms and conditions from the drop down menu.
Cancel, Save, & Submit: Clicking on Cancel will delete all the information and the transaction will not be created. The Cancel action is not reversible. You can save as a draft when you click on the "Save" (5) button so that you can edit it whenever it is required. Clicking on Submit will send the RFQ for approval if any and the transaction will be created.