Customers can view all the information related to Invoices created for the Purchase orders (POs) on the Invoice Listing page. This article will briefly explain how to view invoices generated for POs, their status, and company users with the required permissions can directly create, edit, and approve Invoices, as well as Invoices created by subordinate users. They can also generate a new Non-PO on behalf of the supplier.
In the first step, Click on “Modules” from the header > Select Invoices.

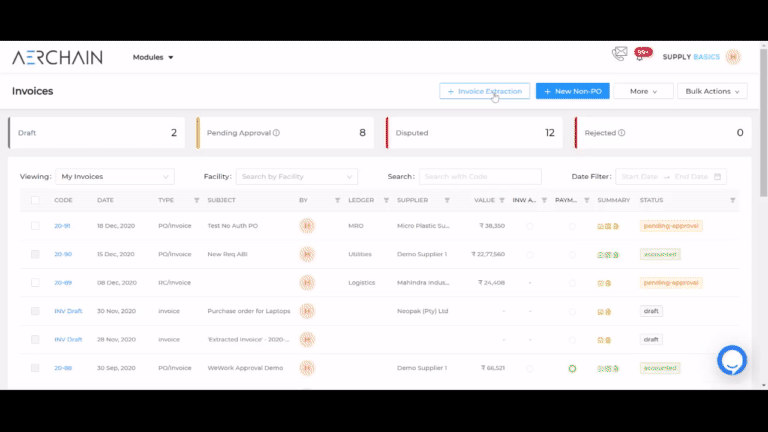
The Invoice Listing Page dashboard will display a summary of the Invoices information such as:
Viewing:
By default, there are three fields in the dropdown that provide different invoices lists: You can select any of the below options to display the Invoices list accordingly.
My Invoices: This will show the list of Invoices created by you.
Pending My Approval: This will display the list of Invoices that are waiting for your approval.
Team Invoices: Invoices created by subordinate users within your Company (depends on User-roles).
Facility: It enables you to quickly search for specific Invoices by entering the Facility.
Search: You can also search a particular Invoice by entering the Invoice Code in the search field.
Date Filter: This filter feature enables you to filter Invoices by date. For this, Click on the Date filter. Now, select the start-date and end-date to list all Invoices created in that range.
Status Cards: There are four tabs which display the status of the Invoices. As shown in the below screenshot. The counter shows how many Invoices are in drafts, pending approval, disputed and rejected.
Column descriptions:
Filter your Invoices:
Applying a filter is an easy and quick way to narrow down your invoices. You can also apply multiple filters on columns to display the required list of invoices.
- Filter by Type: You can apply a filter to display the Invoice list according to the type. Click on the filter button and select one or more Invoice types such as PO, Invoice, Adjustment, VDI, RC/Invoices, Credit notes, and debit notes.
Filter by Creator: This filter is used to display all the invoices according to the creator’s name. Click on the button and select the names from the list, and click Ok.
Filter by Ledger: If you want to display the Invoice list according to the Ledger. Then, Select the button, select checkboxes of Ledger name, and click Ok.
Filter by Supplier: You can apply filter by clicking on the filter button to display the Invoices according to the supplier. Select the supplier name from the list and click on Ok.
Filter by Value: Here you can filter by minimum and maximum value. Click on the button and enter the min value and max value to display the invoices list in that range.
Filter by INW Availability: There are three options in the INW availability filter button to display the Invoice list that are available, not available and partially available.
Filter by Payment: You can apply filters on payment to display the invoice list accordingly. Select paid, pending or partially paid payment checkboxes from the list and click OK.
Filter By Status: Filter out the Purchase orders easily with a status filter button. Click on the status filter button. You can select one or more status checkboxes and then click on Ok. To learn more about the statuses, please refer to Overview of Invoices.
Invoice Extraction: If you use any other system or your ERP to create an invoice. Then, using this tab, you can easily upload your invoice file as the Aerchain platform has the technology to read other format invoices as well. Click on the upload button, add attachments if required, and add notes. You can also select the PO from the dropdown to match with Invoice details. Click on OK. As shown in the below screenshot:
+New Non-PO: You can also create a new Non-PO from this button. When you click on this button, a form gets open. Once you enter all the details of PO and click on the “Submit” button. You can also save the PO for later review which displays in the Status column of the list page as “Draft”.
More > Credit / Debit Notes: If you want to create direct credit and debit notes. You can click on the Credit/Debit Notes button and enter all the details in the form. If the details are entered, then click on the Create button.
Bulk Actions: If you wish to approve multiple Invoices at a time, select the Invoices checkboxes and click on the "Bulk Actions" button on the top of the screen, and click approve.
Pagination: If you want to see the Invoice list on another page. You can click on any number and it will display the results of that page.
Invoice View Page
View PO page will display all the details of the Invoice. It also enables you to accept or reject an Invoice if it is waiting for approval, and process if it is in-progress status.
If you want to view the details of any Invoice. Click on the “Invoice code” on the listing page and the View Invoice Page opens. In the first half of the page, general details of Invoice code displays such as Supplier, Company, PO date, Expected delivery date, Payment terms, Inward details required, PO-Code, Invoice number, Invoice reference, Facility, Shipping, Billing Addresses and attached document if any. In the second half of the page, you will see the Invoice items, Overview and Payments tab.
On the top right-side corner of the page, there are different buttons available according to the Invoice status: As shown in the below screenshot: 
If the invoice is in pending status: You can either take action on the invoice by selecting the “Approve” or “Reject” button from the right side of the dashboard.
Edit button: This button is enabled if it is in “draft” status. You can edit the invoice details and submit them for approval.
Activity Timeline button: You can track the activities performed on this invoice and by whom, at what time, and date. You can also upload the document using this button.
Supplier comments: This is used to chat with the supplier. It is enabled when an invoice is approved.
More button: It has different options in the drop-down such as Recall, Adjustment, and Cancel. These options are enabled according to the invoice status.
Recall button: If it is in “Invoiced” status, then only the recall option is enabled and you can recall the Invoice.
Adjustment button: If the “Invoiced” status is accounted for, then this button is enabled, you can do the adjustment in the invoice.
Process button: When the invoice is approved, then this button is enabled. This is a three-way invoice matching process. When you click on this process button, the invoice form gets open. There are three steps in this process i.e. verify details in the invoice, matching details, and finally a summary of the invoice. You can view the summary status on the list page. As shown below:

OCR button: When the hard copy of the invoice is uploaded, the system captures the details of the invoice and show them there. The customer can verify the details and you can check the details of this invoice using the OCR button. As shown below:

Invoice Items: In this tab, a list of all items appears with product name, quantity, pending quantity, status, ETA, HSN, Taxes, Price, Amount, and Attachments. Along with this, it displays the total amount includes GST and other taxes.
Overview: Using this tab, you can check the invoice details, and if any invoice details don't match then, that field color changes to red color. The green color indicates that the invoice details are correct.
Payments: You can review the payment details by clicking on this Payment tab.